Showing posts with label Recipes. Show all posts

Sunday, 14 April 2013

Victoria Sponge

A few weeks ago I wanted to make a cake quickly and decided to try this recipe. I admit, I wasn't a huge fan of Victoria Sponge cakes as I've found them quite dry in the past but this recipe has certainly changed that opinion. It's delicious and so easy to make!  Big thank you to Mary Berry for changing my mind and for this recipe :o)


Victoria Sponge

225g (8 oz)  Butter or Marg
225g (8 oz)  Self Raising flour
225g (8 oz)  Caster Sugar
2 tsp Baking Powder
4 eggs

Lightly grease 2 x 8" sandwich tins (deep sided) and line the bases with parchment paper. Pre-heat the oven to 180C/350F/Gas Mark 4.
Put all the ingredients into a large bowl and beat for approximately 2 minutes with an electric mixer until the mixture is blended. (This can of course be beaten by hand but may take longer than 2 minutes).
Divide the mixture evenly between the two tins and level the surface with the back of a metal spoon.
Bake for about 25 minutes, until well risen and golden.
Leave the cakes in the ins for a few minutes, then run a knife around the edge of the tkns to free the sides of the cakes. Turn out on to wire racks, peel off the paper and leave to cool completely.

For the filling and topping
About 4 tablespoons of jam (strawberry or raspberry)
A little caster sugar

Choose the cake with the best top, then put the other cake top downwards on a serving plate. Spread with jam, put the other cake on top (top upwards) and sprinkle with caster sugar to serve.

Recipe taken from Mary Berry's Simple Cakes

Well worth making :o)

xx

Sunday, 24 February 2013

Chocolate Oaties

Emily really likes the Cadbury's Brunch Bars that we get here. They're basically an oaty bar with a layer of chocolate on the base.  I was going through magazines, trying to clear them out, when I came across this recipe and thought it would be worth a try.

CHOCOLATE OATIES 


Makes 16

125g  (4oz) butter, plus extra to grease
125g  (4oz) self raising flour
125g  (4oz) light brown soft sugar
125g  (4oz) porridge oats
0.5tsp bicarbonate of soda
1Tbsp golden syrup
125g  (4oz) milk or plain chocolate, melted

Preheat oven to 180C, Gas mark 4 and lightly grease two baking sheets. I used baking parchment instead.
In a large bowl, mix together the flour, sugar, oats and soda. Set aside.
In a small pan, melt butter and golden syrup. Add to the dry mixture and combine.
Divide mixture into 16 and squeeze each portion into a ball.
Arrange on the baking sheets, spacing apart, and squash down a little.
Bake for 15 - 18 minutes until golden.
Leave to cool for 3 minutes on the trays, then transfer to a wire rack to cool completely.
Melt the chocolate in a heatproof bowl over a pan of barely simmering water (or microwave on full power in a glass bowl for 20 second bursts).
Using a pastry brush, pain half of each biscuit, on the top and bottom, with chocolate.
Alternatively, drizzle the chocolate liberally over biscuits.
Transfer biscuits to a wire rack and allow to set before serving.

Biscuits will keep in an airtight container for up to a week. (However, I doubt they'll last that long - ours were gone within a couple of days!)

If you make this recipe, I hope you enjoy :)

My brother-in-law has just given me a flapjack (crunchie) recipe very similar but which includes coconut and chopped nuts. I'm making that today and will let you know how they turn out.

xx

Monday, 21 May 2012

Chocolate Cake Recipe

I showed this photo of the cake Emily and I made last Sunday in a previous blog post and said I'd post the recipe once I'd got it from Emily (who found it on the internet).  This evening we looked it up again and here it is.


Chocolate Cake

Preheat oven to 350F/180C/Gas 4

Ingredients:
6 oz (175g) castor sugar
3 oz (75g) margarine or butter
2 large eggs, beaten
5 oz (140g) self raising flour
1/2 oz (15g) cocoa
2 tbsps milk
2 tbsps boiling water
(Note:  We increased the cocoa powder to 25g and decreased the self raising flour to 130g)

Grease 2 x 8" cake tins.

In a large bowl, cream the sugar with the butter until light and fluffy.
Add the beaten egg and beat well.
Sieve the cocoa and flour and gently fold into the butter and egg mixture.
Add the milk and boiling water and stir well.
Divide the mixture between the two tins and gently spread to create a smooth surface.
Bake in the preheated oven for 20 - 25 minutes.
Leave in the tin for a few minutes.
Remove the cakes from the tins and leave to cool on a wire rack.
Once cooled, decorate as desired.

As I mentioned in the previous post, I melted a slab of Bournville chocolate and a little butter (sorry, didn't measure how much - maybe about 30 - 50g) in a bowl over a pot of simmering water. Once it had melted it was still a little bit thicker than I wanted to I added a little milk to thin to the consistency I wanted.  I used this to put between the cakes and over the top.

Next, make a cup of tea/coffee, cut yourself a slice and enjoy :)

xx

Sunday, 8 January 2012

Day 7

Pancakes for breakfast

Emily couldn't make up her mind what she wanted for breakfast but settled on pancakes. We haven't made them for ages so they made a change.  I used Jamie Oliver's 'one cup' pancake recipe for the first time and they worked out quite well.


UPDATE : RECIPE ADDED 

Sweet Tea, here's the recipe for you :o)


One Cup Pancakes


Use a cup to measure the ingredients, doesn't matter what size so long as you use the same cup to measure both the flour and milk.


1 cup  Self Raising flour

1 cup Milk

1 egg

Pinch of salt

& I added 1 Tbsp sugar


Mix them all together until well blended. Melt some butter in the frying pan and add small ladle fulls of batter (this makes small pancakes). When bubbles form on top, turn and cook on the other side. Should be golden brown on both sides.  Really easy.

xx

Saturday, 7 January 2012

Day 6

My photo for the 6th :o)
Alice and I made cookies together yesterday, she enjoyed watching everything being added to the mixer and it going round and round but I think, more than that, she enjoyed gettting to eat the mixture off the beater once I'd finished.
 I thought it might be best to strap her in to her highchair before letting her have the beater otherwise I would have been covered in cookie dough too ;o)
 First taste she had to make sure she liked it
 Yes, it's good!
 The finished cookies weren't too bad either :o)
And after showing these photos I thought you might like the recipe too.

Chocolate Chip Cookies (Mary Berry recipe)

100g (4 oz) butter, softened
75g (3 oz) caster sugar
50g (2 oz) light muscovado sugar
1/2 tsp vanilla extract
1 large egg, beaten
150g (5 oz) self-raising flour
100g (4 oz) plain chocolate chips (or milk chocolate if you prefer)

Lightly grease baking trays (or line with parchment paper).
Pre-heat oven to 190C/375F/Gas Mark 5.
Measure the butter and sugars into a medium bowl and beat thoroughly with a hand held electric mixer or wooden spoon until evenly blended.
Add the vanilla extract to the beaten egg and then add these gradually to the butter and sugar mixture in the bowl, beating well between each addition.
Next, mix in the flour and lastly stir in the chocolate chips.
Spoon large teaspoons of the mixture on to the prepared baking trays, leaving room for the cookies to spread.
Bake in the top of the oven for about 8 - 10 minutes, until the cookies are golden. (Mine took closer to 12 minutes so time will vary depending on your oven)  Watch them carefully as they can turn dark brown very quickly (which one batch did while I took Alice out of her chair - they still taste good though).
Allow the cookies to cool on the tray for a few minutes, then lift off with a palette knife and place on a wire cooling rack.
Leave to cool completely then store in an airtight tin. (They are delicious warm too ;o)  ).

Enjoy!

xx

Thursday, 17 November 2011

Cranberry Sauce

A couple of years ago Ruth did a post about a cranberry sauce she made using Nigella Lawson's recipe.  I tried it that year and have made it each year since. So, when I saw Sainsbury's had fresh cranberries in this week, I bought a couple of bags and decided to make some this week. One portion is not enough so this year I made one and a half times the recipe but should maybe have done double quantities instead.  However, I'll be looking forward to having this with Christmas lunch again this year. Thanks for sharing, Ruth :)


Redder than Red Cranberry Sauce
From Nigella Lawson's "Nigella's Christmas Kitchen 2007"

12oz/340g Fresh Cranberries
7oz/200g Caster Sugar
3 Tbsp/45ml Cherry Brandy
4 fl.oz/75ml Water
Lemon juice, optional

Place all the ingredients in a pan and cook until the liquids have reduced to a thick Cranberry Sauce.

The pectin-rich nature of the fruit means that it solidifies briskly as it cools, so take the pan off the heat to stop it from cooking and reducing when you still think there's too much liquid. Once the berries have burst, which should be after about 10 minutes, it should be ready.

Taste to test whether the sauce needs more sugar (if you find it too sweet just add some lemon juice).

Hope you enjoy it as much as we do.

And finally, my photo for the recipe book :)
xx

Monday, 14 November 2011

Fairy cakes

I'm still hugely inspired by the recipe book Sarah (Clover Lane) made using Blurb. I would love to make one and have now started taking photos of recipes I make.  This weekend it was chocolate fairy cakes - I have tried a number of different recipes but come back to this simple recipe time and again.


Fairy cakes (makes 12)

125g marg
125g castor sugar
125g self raising flour (for chocolate cakes I use 95g SR flour and 30g cocoa powder)
1/2 tsp baking powder
2 eggs
1 Tbsp milk
1  tsp vanilla essence

Preheat oven to 220C/400F/Gas 6
Put cake cases in to muffin tin
Put all the ingredients in a bowl and mix until the mixture is very soft and you can't see any lumps of marg.
Spoon into paper cases
Bake for 10 - 15 minutes
Leave on a wire rack to cool before icing.

Chocolate buttercream icing

85g soft butter
150g icing sugar
25g cocoa powder
1Tbsp milk (or I used coffee for a slight difference)

Mix all ingredients together until mixture is smooth.
Pipe on to fairy cakes and top with a Malteser.

Enjoy :)

xx

Thursday, 3 November 2011

Worth taking a look at.

This photo is of "Herman, the German Friendship Cake" which I made a few weeks ago, (not actually anything to do with Sarah's blog) because I can't post without a photo.


I've been reading Sarah's blog, Clover Lane for a little while now but her post this morning blew me away. What a fantastic idea - if you like cooking, go and see what she's done with her recipes :).
Thanks Sarah, for sharing this with everyone.
xx

Friday, 18 March 2011

A recipe for today

I've just made this apple cake and can't wait to try it - it smells delicious.


DORSET APPLE CAKE
1 large Bramley apple (cooking apple), about 225g
225g self raising flour
1 tsp baking powder
1/2 tsp mixed spice (I added a little more)
125g cold butter, diced
125g caster sugar, plus 1 tbsp for dredging
Finely grated zest of 1 lemon
2 medium eggs, beaten

Preheat the oven to 190C, 375F, Gas mark 5 and lightly grease a 20cm/8in springform cake tin.
Peel the apple, cut into quarters and remove the core. Reserve one of the apple quarters and dice the rest.
Sift the flour, baking powder and mixed spice into a large bowl.
Rub in the diced butter to form fine breadcrumbs.
Stir in the sugar, diced apple and lemon zest, then gradually stir in the beaten eggs to form a stiff mixture.
Spoon into the prepared tin and level the surface with the back of a spoon.
Thinly slice the reserved apple quarter and arrange on top of the cake.
Bake for 30 - 40 minutes, until springy to the touch. Dredge with the remaining sugar, then leave to cool in the tin for 10 minutes.
Turn out on to a wire rack to cool completely.
Slice and serve with clotted cream.
.
After getting a taste of spring recently, it was a bit of a shock to the system to have it raining again today. Claire and I wanted to go into town and Alice didn't have any choice ;o) - fortunately, Claire had found a little jacket when she was sorting through Alice's clothes the other day and today she got to wear it for the first time :o)  
 She certainly didn't seem to mind having it on.

Another cute photo of Claire/Mummy and Alice :o)
.
Jon should be home shortly and it'll be time for us to head out for dinner ;o).  
When we get back I'm looking forward to chatting to Deb on Skype for the first time.  
xx

Tuesday, 15 February 2011

Chicken Cannelloni

Just a recipe for today.  Last night Craig made "Chicken" Cannelloni for dinner and it was really tasty.  We couldn't get minced chicken so we used minced turkey but I don't think it made much difference. Next time I would probably have two Cannelloni tubes and some salad because it was very filling.


Chicken Cannelloni  (Serves 4)

1 tbsp  Olive Oil
1 onion, peeled and chopped
1 small garlic clove, crushed
40g (1.5 oz.) mushrooms, chopped
0.5 tsp dried mixed herbs
225g (8 oz) minced chicken
1 x 200g (7 oz) can tomatoes
0.5 tbsp tomato ketchup


Cheese Sauce
30g (1.5 oz) butter
30g (1.5 oz) flour
0.5 tsp paprika
400ml (14 fl oz) milk
100g (3.5 oz)cheddar, grated

8 no pre-cook cannelloni tubes


Heat oil in a saucepan and sauté the onion and garlic for 2 minutes. Add the mushrooms, herbs and chicken and sauté for 3 minutes. Stir in the chopped tomatoes and ketchup and simmer for 20 minutes.

Preheat the oven to 180C/350F/Gas 4, then make the cheese sauce. Melt the butter, then stir in the flour and paprika and cook for 1 minute. Gradually whisk in the milk. Bring to the boil and then simmer, stirring until thickened. Stir in 50g (2oz) of the grated Cheddar.

Stuff the cannelloni tubes with the chicken filling and arrange them in a shallow oven proof dish. Pour over the cheese sauce, sprinkle with the remaining Cheddar cheese and bake in the oven for 25 minutes.

Sunday, 24 October 2010

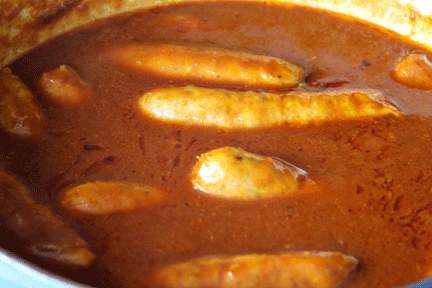
Let's Eat Blog Hop - Curried Sausages

If you've come to my blog for the first time by following the Let's Eat Blog Hop, welcome!  You're likely to have come here from Cate's blog and I hope you'll enjoy the recipe I've got to share. When Amy suggested a blog hop where we all get to share a favourite recipe, I was more than ready to join in. If you haven't come here from Cate's blog but would like to carry on with the blog hop, you can either follow on to Deb's blog and keep going until you get back here or a full list of participating bloggers can be found on Amy's site. Enjoy!

The recipe I'm sharing today is one that I've developed over time but came about because I remember my Mum making Curried Sausages when we lived in South Africa. However, when I asked her for a recipe she couldn't remember how she'd made them and hence, my own version.
 You don't need many ingredients: Sausages, chopped onion, Oxo beef stock cubes, curry powder and tomato and herb sauce.  Quantities vary depending on how many sausages you're cooking so I'll give the amounts I use for 12 sausages and you can vary it to your taste.
 Firstly, fry 1 chopped onion in a little olive oil until onion begins to brown.
 Add in 2 tsp of Medium curry powder (I use Rajah Medium Curry Powder which I buy from the South Africa shop) and 3 Oxo beef stock cubes, crumbled.
 Stir it all together
 Then add the Tomato and Herb sauce ( I use 290g jar of Sainsbury's Tomato and Herb Pasta Sauce) and I normally half fill the jar with water and add that too.
 Let it cook for approx. 5 minutes
 In our household I then blend the sauce mixture (I have fussy children) and return it to the pot.
 Add the sausages to the mix, cover and leave to simmer for 20 - 30 minutes
 Until the sausages are cooked through.
Serve on a bed of rice and enjoy!

I look forward to hearing from anyone who may try the recipe out :)

Now it's time for you to move on to Deb at Paper Turtle for the next link in the blog hop. I'm sure she'll have another delicious recipe waiting for you.

xx

Saturday, 2 October 2010

Chocolate Banana Bread (with Walnuts)

This morning after coming home from work I was in the mood for baking. Craig (Claire's partner) passed his Driver's Theory test this morning, so I thought I'd make some Chocolate Brownies for him and because we had some bananas which need to be used up, I tried a new Banana loaf recipe.
 Chocolate Banana Bread
.
250g    Self Raising Flour
A good pinch of Salt
150g    Castor Sugar
100g    Butter, melted and cooled
2          Medium Eggs, beaten
250g    Peeled ripe Bananas (2 large or 3 medium)
75g      Dark chocolate, chopped
100g    Walnut pieces
.
A 900g loaf tin (about 26 x 12.5 x 7.l5 cm) greased with butter and the base lined with greaseproof paper
.
Preheat the oven to 180C/350F/Gas 4
Mix the flour with the salt and sugar in a mixing bowl. Add the melted, cooled butter and the beaten eggs. Roughly mash the bananas with a fork - there should still be some lumpy bits - and add to the bowl. Add the chocolate and walnut pieces and mix all the ingredients together with a wooden spoon until thoroughly combined.
Transfer the mixture to the prepared tin and spread evenly. Bake in the preheated oven for 55 minutes, until the loaf is a good golden brown and a cocktail stick inserted into the centre comes out clean.
Leave to cool for 5 minutes, then turn out on to a wire rack and leave to cool before slicing. Store in an airtight container.
Recipe from: The Great British Book of Baking (I can see there'll be a few more recipes for me to try from this book :)  )
As you can see in the first photo, I didn't wait for the loaf to cool before cutting the first slice - hence the smeared chocolate across the loaf ;o)
I put the flour, egg & banana into my free standing mixer and mixed that first then added everything else and mixed again. That seemed to work out fine.
The loaf was really easy to make but I did end up having to leave mine in the oven for an extra 10 minutes because it wasn't cooked through properly after the given time - you would just  have to do what's right for your oven.
I had mine with some butter on and it was really yummy! Hope you enjoy :o)
xx

Sunday, 22 August 2010

Recap and a Recipe

I can't believe it's a week since the Baby Shower - I think it's taken me about that long to get over it ;o). Emily and I have had a fairly quiet week, we've been in to town a few times, met up with friends and also had a chance to stay at home and read our books.
On Friday, Claire had an appointment at The Princess Royal at 9am and they warned that they are doing some building work so to leave plenty of time to find parking etc. We left home at 8am, got to the hospital by 8.30am and found parking without any problem. We didn't see any building work in progress either so I don't know what that was about. Long story short, Claire needed to have some blood tests done that have to be sent down to Brighton (not anything serious) but they didn't have anyone that could do that on Friday so we're going back again tomorrow morning. At least we didn't have to hang around too long and we shouldn't have to tomorrow either. We did a little bit of shopping on the way home and Claire had time to have lunch before going in to work for 1pm.
I had bought the ingredients to make a Key Lime Pie for last week but couldn't find Claire's recipe book with the recipe in and couldn't ask her for it otherwise she'd have known something was going on. Yesterday, however, Craig got the book out of the loft for me and I was able to use the ingredients before I had to throw them out ;o) This recipe from Mary Berry's Foolproof Cakes is one of the nicest I've tasted and in case any of you feel like trying it out, here it is:

Key Lime Pie

4 large

Limes

400g (14oz) tin

Condensed Milk

450ml (15 fl oz)

Double Cream

For the Base

150g (5oz)

Digestive Biscuits

65g (2 ½ oz)

Butter

25g (1 oz)

Demerara Sugar

· For the base, put the digestive biscuits into a polythene bag and crush them to crumbs with a rolling pin. (Or put in a food processor and pulse till like breadcrumbs)

· Melt the butter in a small pan, and add to crushed biscuits and the Demerara sugar. Mix well, and then spread the mixture over the base and sides of a 20cm (8 in) loose bottomed sandwich tin, pressing it with the back of a metal spoon to make it firm.

· Remove the rind from 1 of the limes with a zester and set aside to decorate the top of the pie. Squeeze the juice from all the limes

· Put the lime juice, condensed milk and 300 ml (10 fl oz) of the double cream into a mixing bowl and whish until well blended.

· Pour into the prepared crumb crust and gently level the surface. Chill for several hours until set, push up the tin from the base to remove the ring.

To decorate, whip the remaining double cream until it just holds its shape, then either spread over the surface of the pie or spoon it in blobs around the edge. Decorate with the reserved lime zest. Serve well chilled.
I also made some Chocolate Brownies (recipe here) which turned out beautifully (even if I say so myself ;o) ) I took a slice of each to the lady I help on the weekends.
I hope you're having a great weekend too.
xx
PS Apologies for the way the recipe has posted, I don't seem to be able to get it to look the way I wanted in Blogger :(

Tuesday, 27 July 2010

Chocolate and Banana Cake

Today has been fairly productive as well as laid back ;). I've taken photos throughout the day and am hoping to make layout (one of these days) showing a day in my life (like Mel at I Speak Melsh)
One of the things I did was make Banana and Chocolate Loaf because we had some bananas which were very ripe!
.

Chocolate and Banana Cake

Makes 1 loaf (about 12 slices)

From Rachel Allen’s “Rachel’s Favourite Food for Friends”

75g/3 oz

Chocolate

110g/4 oz

Soft butter

125g/4.5 oz

Castor Sugar

2

Eggs

125g/4.5 oz

Self Raising Flour

1 level tsp

Baking Powder

1 rounded Tbsp

Cocoa

2 medium

Bananas, peeled & mashed

.

· Preheat oven to 180C/350F/Gas 4. Line a 900g/2lb loaf tin with baking parchment.

· Melt the chocolate in a microwave or in a bowl over a pan of barely simmering water.

· With a wooden spoon, cream the butter, add the sugar and beat well.

· Add the eggs one at a time, beating all the time.

· Add the sieved flour, baking powder and cocoa, followed by the melted chocolate and mashed bananas.

· Stir to bring together.

· Pour into the prepared loaf tin and place in the preheated oven. Cook for 50 – 55 minutes, or until a skewer inserted into the middle comes out clean.

· Cool in the tin for about 5 minutes before removing.

Needless to say, I had to try a slice with my mug of tea this afternoon :)
xx

Wednesday, 3 February 2010

Half way through the week

Today's been quite a quiet day. I did my exercises first thing this morning (well, once Emily had gone to school!) and then took Cloud for a walk. It was a bit grey and drizzly but we did our circuit and home again in 20 minutes. Today's other exercise was going up and down the stairs three times in succession and to do that four times in the day. I've got one more set to do and then I'm done. Claire invited Mum, Dad and me for breakfast at Wetherspoons. I'd told her about going last week but because she'd been at work she wasn't able to join us. Seeing as she's on holiday this week she thought it would be good to go again. Really good value and very enjoyable. Thanks Claire!
.
I had the house to myself for a couple of hours this afternoon for the first time in ages. I ate my lunch watching an episode of ER then brought the kittens down into the lounge. When Emily got home we let them out to explore and they met Cloud and Tom. Cloud follows them around and gets in their way but Tom was happy to watch from his spot on the sofa. There wasn't any hissing or claws out so I'd say it was fairly successful. Charlie wasn't in the house at the time so I'm not sure what he'll be like. Hopefully he'll be fine and then we'll be able to let them out of Emily's room.
This evening's supper was a chicken and vegetable curry with basmati rice. It was very tasty and I'm quite full now. For anyone wanting a slightly healthier curry, this is the recipe for one person (taken from Rosemary Conley's Inch Loss Plan).
.
Quick Chicken Curry
Dry fry 1 x 115g chopped chicken breast (no skin) in a preheated non stick pan with 1/2 a chopped onion and 1 crushed garlic clove. Sprinkle 1 tsp curry powder over and cook for 1 minute then add 1 small chopped chilli (I didn't add chilli as I don't like my curry too hot), 1/2 chopped green pepper (I used red pepper), 25g button mushrooms and a 400g tin of chopped tomatoes. Simmer for 5 minutes to reduce. Serve with 144g cooked basmati rice (55g uncooked weight).
.
Enjoy!!
xx

Saturday, 30 January 2010

Chocolate Brownies

This morning I decided I should use up some of the Bournville chocolate I had so that I don't eat it all. Everyone seems to love Chocolate Brownies and these ones are delicious. Please note that they are on the cake stand :) Thanks Deb!!
.
For those of you who may like to try these out, here's the recipe
.
CHOCOLATE BROWNIES
Makes about 16 large and 25 small ones
180g (6oz) butter
180g (6oz) good dark chocolate (though I use Bournville and they're fine)
3 eggs
250g (9oz) caster sugar
110g (4oz) plain flour
100 - 150g (3.5 - 5.5oz) chopped walnuts or muesli (optional)
.
Preheat the oven to 180C/350F/Gas 4. Line the bottom of a 20cm (8") square tin, or a small 23 x 33cm / 9 x 13in) swiss roll tin, with greaseproof paper or tin foil. Carefully melt the butter and chocolate in a pan on a low heat.
In a separate bowl, beat the eggs and sugar. When the chocolate has melted, let it cool for a minute and then mix it with the eggs and sugar in the bowl. Stir in the flour and nuts (if using) and beat to combine. Empty into the prepared tin and place in the oven. Cook for 32 - 42 minutes (depending on the oven). When cooked it should be crisp on top but still slightly dense and fudgy inside.
Cut into squares, and when it has cooled, take it out of the tin.
.
I line the tin with parchment paper and omit the nuts because Claire doesn't eat nuts. Please let me know if you try the recipe and if you enjoyed the brownies as much as we do.
xx